
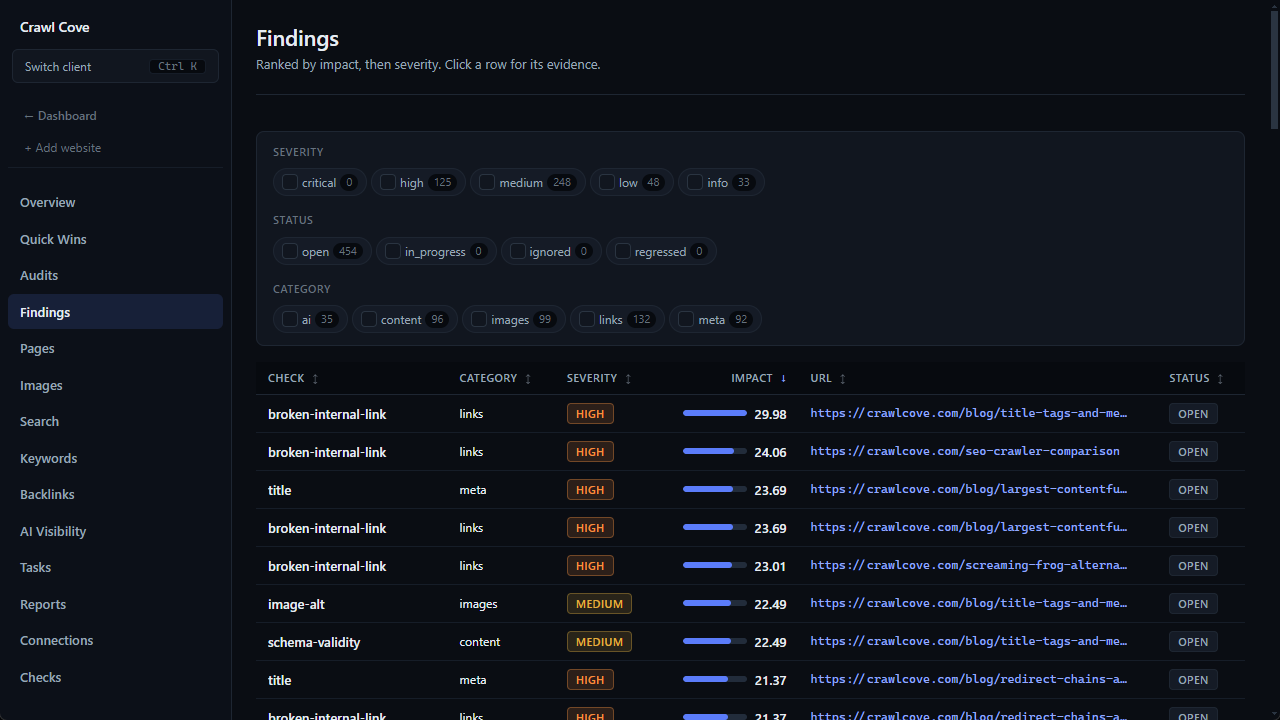
The Findings page is the heart of Crawl Cove. After a crawl finishes, every issue the deterministic checks detected lands here in a single filterable, sortable table. A real site can produce hundreds of findings. The Findings Explorer exists to turn that wall of issues into a short, ordered list of what to do first.
Every row is a finding: one detected issue, produced by a coded check, with a severity, the URLs it affects, evidence, and a status. None of it is AI-guessed: the optional LLM layer only explains findings, it never creates or rescores one.
The columns
The table gives you everything you need to triage at a glance:
- Check: which rule produced the finding (e.g.
title,broken-internal-link). - Category: the area it belongs to (meta tags, links, content, security, and so on).
- Severity: critical / high / medium / low / info.
- Impact score: a ranking number that blends severity with real Search Console traffic on the affected URLs.
- Affected-URL count: how many pages carry this finding.
- Status: open / in progress / ignored / fixed / regressed.
Default sort does the triage for you
You don't have to set anything up to get a sensible order. The table's default sort ranks by impact score, then breaks ties by severity. The result: even before you touch a filter, the most important issues are already at the top.
There's a smart fallback baked in. Impact score needs Google Search Console to weight findings by real traffic. If GSC isn't connected for this client yet, the table simply ranks by severity instead, so a no-GSC audit still surfaces the most severe issues first rather than dumping findings in random order. The mechanics of how impact is actually calculated get their own guide: Prioritising with impact score.
Filter to the work in front of you
Multi-select filters by severity, status, and category narrow the table
to exactly the slice you're working on, such as all open high-severity link
issues.
Each filter shows live counts so you can see how big each bucket is before you commit,
and changing a filter resets you to page one. A pager appears only when there's more
than one page of results.
Tip
Click any column header to sort by it, cycling ascending ↑ / descending ↓ / none ↕. Hover a header for about two seconds to get a tooltip explaining what the column means. Combine a status filter (open) with an impact sort and you have your work queue for the week.
From a row to action
Clicking a finding row opens the evidence drawer: the offending HTML, the full list of affected URLs, which internal pages link to them, a plain-English explanation, an effort estimate, and a one-click Create Task button. That drawer is rich enough to deserve its own walkthrough: The evidence drawer.
Next steps
- Prioritising with impact score: how the ranking number is built, and why GSC unlocks it.
- The evidence drawer: turn a finding into evidence and a tracked task.